
Refectory and Associated Rooms
The Refectory and two associated rooms—the Trapezoidal Room and Small Rectangular Room—fill the space between the Repit temple and its enclosure wall.
The Refectory and Trapezoidal Room were excavated by the Egyptian Antiquities Organization (EAO) in the 1980s and 1990s, but the Small Rectangular Room has yet to be investigated.[1] Details of their spatial organization, especially the positioning of doorway, suggest shared activities that also required communication with the Six-Pillared Hall to the east.
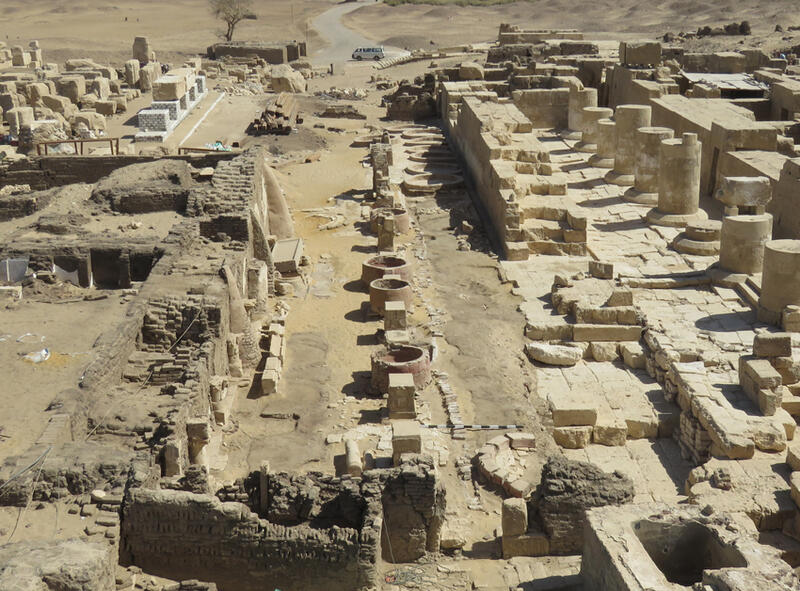
Figure 1. The Refectory (center) as it appeared in 2017, looking south. The Repit temple is on the right, and the temple enclosure wall is on the left. Partially visible are the Trapezoidal Room and Rectangular Room (below) and the Six-Pillared Hall (far left).
Refectory
The Refectory is located on the east side of the Repit temple, occupying the space between its exterior wall and the eastern enclosure wall (fig. 1). It shares the northern part of its east wall with the Six-Pillared Hall, which lies to the east. This large, communal dining space, not present in normal household settings, strongly suggests that the adaptive reuse of the Repit temple was associated with a monastery.
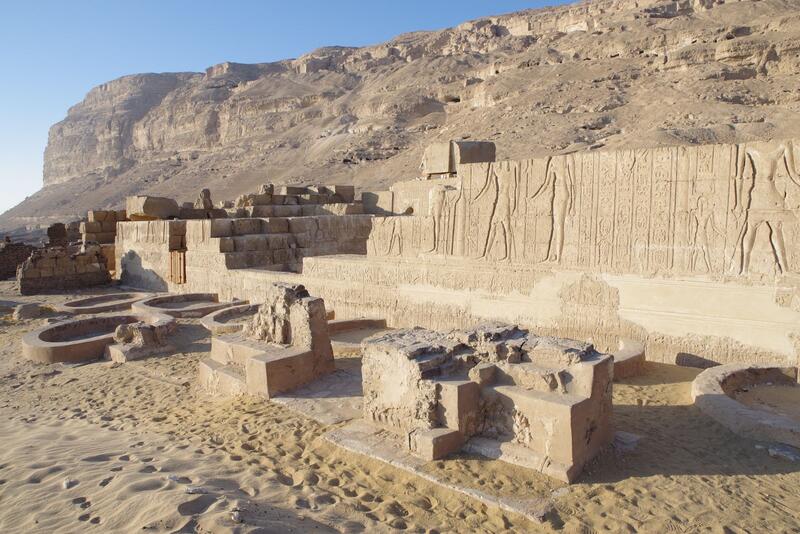
Figure 2. View of the south end of the Refectory as it appeared in 2016, with circular seating arrangements, looking south west. Conservation of the floor, piers, and seating circles was part of the EAO work in this area.
YMAP-South’s work here began in 2016. Archaeological recording was completed by Gillian Pyke, assisted by Sharif Munir Adly, with digital archaeology by Alberto Urcia and epigraphy by Stephen J. Davis (fig. 3). Ceramics and glass from the 2011 University of Tübingen excavations were studied by Gillian Pyke, assisted by Sharif Munir Adly and Hanna Maher Matta.
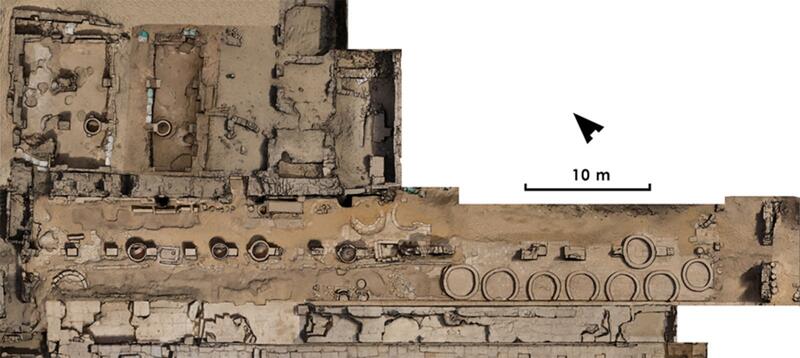
Figure 3. Refectory (bottom), Six-Pillared Hall (top left), and unexcavated spaces (top centre) as they appeared in 2016–2018. The east wall of the temple is at the bottom of the image.
The short north and south ends of the Refectory were defined by brick walls, the southern of which is almost completely lost. Its south doorway, the position of which is indicated by limestone pavers, led to the spaces within the temple converted to monastic use, while the north doorway communicated with the Trapezoidal Room and adjacent well complex. The tiny Rectangular Room, probably not original to this space, was accessed via a second doorway, framed in limestone and later blocked.
A short staircase at the north end of the Refectory’s east wall gave access to the Six-Pillared Hall and beyond it to other structures noted by Petrie, which may have belonged either to the monastery or to the settlement (fig. 4; see also fig. 3).[4] A second doorway in the same wall led to an as-yet unexcavated area, which includes a substantial staircase to the south of the Six-Pillared Hall but not accessible from it (see again fig. 3). Both of these eastern doorways probably took advantage of weakened or collapsed points in the former enclosure wall. The wall itself was extensively patched on its western face prior to the construction of fired brick arcading set on short limestone columns with limestone bases and capitals, some of which were later enclosed in plastered brickwork to form buttresses (fig. 5). Similar arcading can be expected on the west side of the Refectory but does not survive. This lateral arcading matched a medial line of freestanding piers, which together supported the roof, suggested by Kościuk to have been partially vaulted.[5]
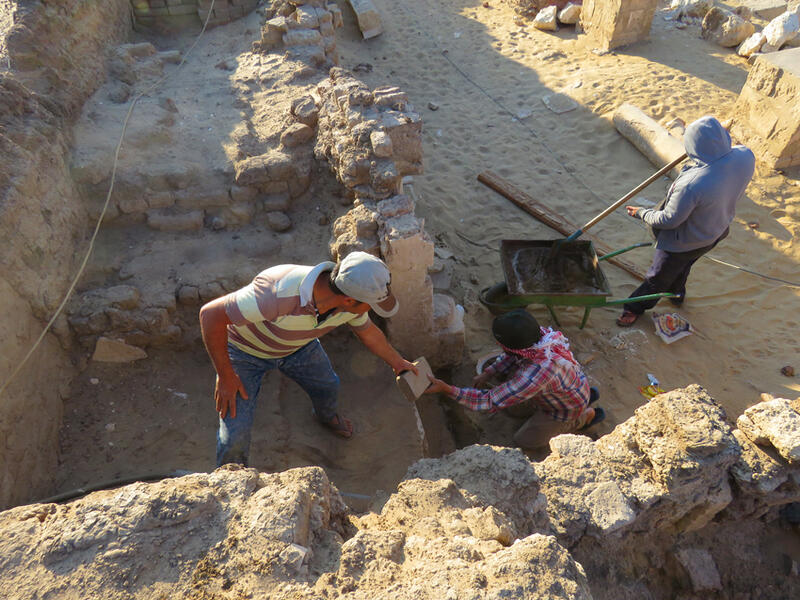
Figure 4. Adel Labib Samir, Sharif Munir Adly, and Nady Aid Ghula repairing the staircase in the north doorway in 2018. They also blocked the west side of the doorway to minimize foot traffic.

Figure 5. East wall of the Refectory as it appeared in 2017, with remains of arcading, buttressing and wall plaster. Most of the wall writings are preserved on the plaster area to the far right.
The spaces between the medial piers were occupied by a series of circular brick-framed ceramic storage installations (fig. 6), of the same type as those in the Six-Pillared Hall, and a rectangular water tank. These installations blocked access between the east and west sides of the Refectory. Passage between the two sides was possible only via an approximately centrally-placed doorway bearing traces of a fairly long section of wall writing (dipinto) in very faded green paint. A further set of ceramic installations was set against the west wall, and a long rectangular granite table, with its own similar installation, was situated against the east wall just to the north of the central doorway. A large number of wall writings (dipinti) in black and red pigments survive on sections of the white plaster in this area, many of were written by female monastics who identify themselves by name (fig. 7).[6]
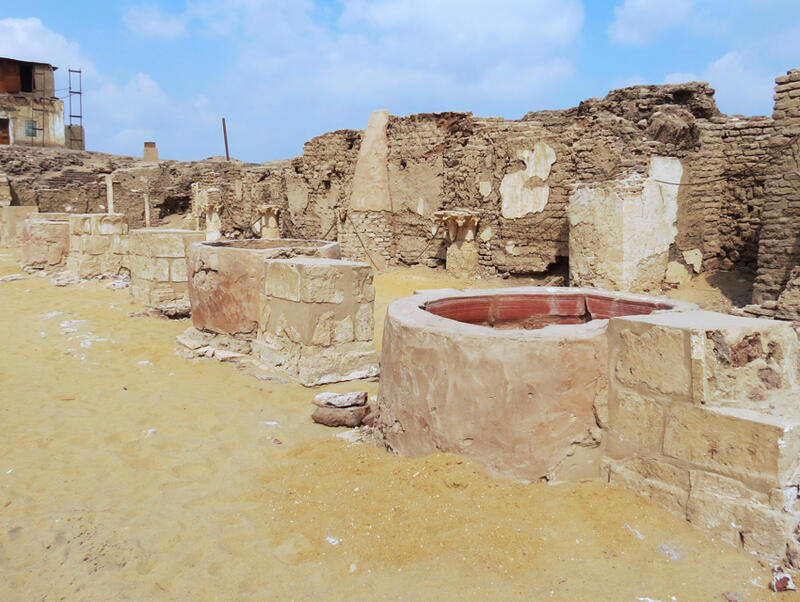
Figure 6. View of the north end of the Refectory as it appeared in 2014, with piers and ceramic installations, looking north east.
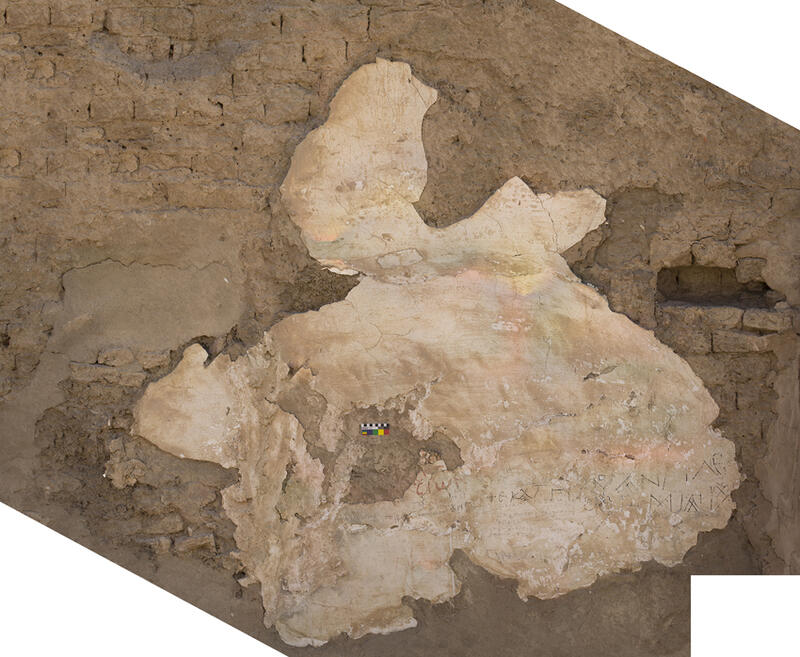
Figure 7. Area of plaster on the Refectory’s east wall bearing red and black dipinti.
The two aisles of the Refectory were filled with low plastered fired brick seating circles, each originally paired with a central table, confirming the function of this space (fig. 8, see also figs. 1–3). The seating circles were built directly onto the limestone paving. Breaks in the paving reveal traces of earlier circles, made of mud brick and associated with a mud floor surface, both probably originally plastered.

Figure 8. Seating circles in the south part of the Refectory as they appeared in 2017, looking north. These were partially restored by the EAO in the 1980s and 1990s.
The lower of the two deposits identified in the 2011 clearance of the north part of the Refectory contained many ceramic vessel types that are also present in the Six-Pillared Hall. Dining vessels include slipped and polished or polychrome-decorated bowls of various sizes and carafes, as well as plain deep goblets and cups, but exactly how these were used together could not be determined. Also found were numerous deep bowls and colanders more appropriate to food preparation and, surprisingly, some amphorae, which would have been used for storage. Most of these consist of the early form of Late Roman Amphora 7, with a smaller number of Aswan amphorae. There were few cooking vessels. The Refectory assemblage from the lower layer, like that in the Six-Pillared Hall, dates to the later sixth to seventh century and belongs to the latest activities in this space.[7]
The ceramic material in the upper deposit includes some of the same types, but many vessels are consistent with the early medieval repertoire known from midden deposits throughout the temple, which are associated with waste disposal from the nearby settlement after the monastery’s abandonment.[8]
Trapezoidal Room and Small Rectangular Room
The Trapezoidal Room and Small Rectangular Room are located to the north of the Refectory (fig. 10). A functional association with the Refectory is suggested by their position and organization. The Trapezoidal Room was excavated by the EAO in 1980–1990, but the Small Rectangular Room was left unexcavated, probably because access is difficult.[9]Archaeological recording was completed in these spaces by Gillian Pyke in 2019, assisted by Sharif Munir Adly and Adel Samir Labib, with digital archaeology by Alberto Urcia.
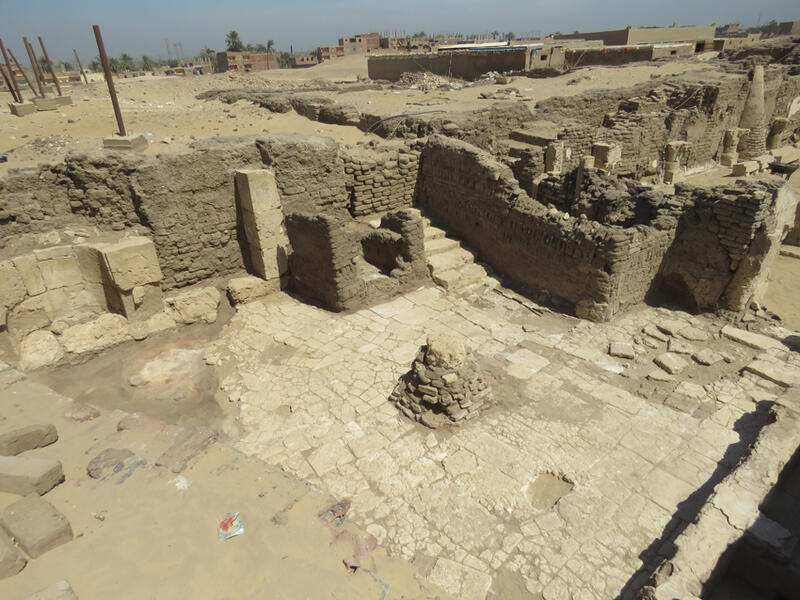
Figure 9. View of the Trapezoidal Room and Small Rectangular Room (upper right) as they appeared in 2019, looking south east. The Refectory lies to the south (upper right) and the Six-Pillared Hall to the south east (top).
The west wall of the Trapezoidal Room is formed by the former enclosure wall of the temple, with a limestone-treaded staircase leading up to the vicinity of the Six-Pillared Hall’s entrance at its south end. The staircase is situated between a mud brick cupboard and the Small Rectangular Room. The south wall was originally shared with the Refectory, with which it communicates via a doorway next to the last of the Refectory’s medial piers. A large rectangular plastered fired brick cistern forms the west wall and feeds a pair of low, floor-level tanks. A passage to the south of these features leads to a similar space on the west side of the cistern, adjacent to the well. The north wall, possibly a modern conservation measure, consists of limestone blocks in its lower part and fired bricks in its upper. The limestone-paved floor, which was repaired several times, has at its center a limestone column sheathed with fired brick. There are traces of ovens where the floor is broken in the north east corner (fig. 10).
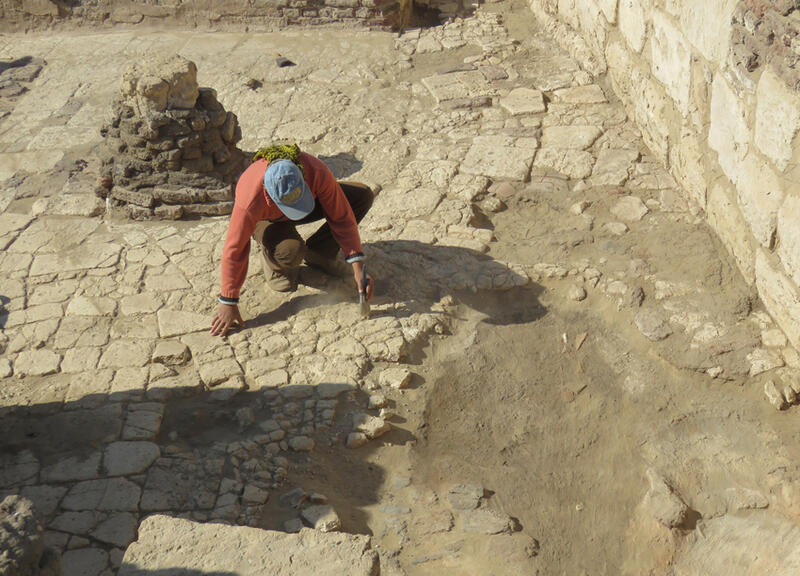
Figure 10. Sharif Munir Adly preparing the Trapezoidal Room’s limestone floor for photography in 2019. The column is top left and the north wall of the room is top right. Traces of ash from the ovens are visible bottom right.
The Small Rectangular Room (see fig. 9) was not part of the original configuration of this space but was built into the southwest corner of the Trapezoidal Room. It was only accessible from the Refectory, through a limestone-framed doorway that was later blocked. It is mainly built in mud brick and the interior was coated with a thin white plaster over thicker mud, traces of which remain in the small niche in the south wall.[10]
[1] Y. el-Masry, “More Recent Excavations at Athribis in Upper Egypt,” Mitteilungen des Deutschen Archäologischen Instituts Abteilung Kairo 57 (2001), 217, fig. 4; J. Kościuk, “The Architectural Record. A General Description of the Individual Areas of the Town and Their Monuments,” inAthribis I, General Site Survey 2003–2007, Archaeological & Conservation Studies. The Gate of Ptolemy IX: Architecture and Inscriptions, ed. R. El-Sayed and Y. El-Masry (Cairo: Institut français d’archéologie orientale, 2012), 108, fig. 2.3.9; M. Abul-Yazid, S. Hammam, S. Abderrahman, and A. el-Qadi, “Excavations in the Temple of Repit at Athribis in the 1980s,” in Athribis V, Archäologie im Repit-Tempel zu Athribis 2012–2016, ed. M. Müller, M. El-Bialy, and M. Boriak (Cairo: Institut français d’archéologie orientale, 2019), 435, fig. 12.
[2] El-Masry, “More Recent Excavations,” 217, fig. 4; Kościuk, “Architectural Record,” 108, fig. 2.3.9; Abul-Yazid et al., “Excavations,” 435, fig. 12.
[3] Abul-Yazid et al., “Excavations,” 435, fig. 15.
[4]W. M. F. Petrie, Athribis, British School of Archaeology in Egypt and Egyptian Research Account 14. London: Quaritch, 1908, 11, pls. XIV and XXXV; Kościuk, “Architectural Record,” 108, figs. 2.3.10-2.3.15.
[5] Kościuk, “Architectural Record,” 108.
[6] On these wall writings, or dipinti, see S. J. Davis, “Anastasia, Thecla, and Friends: Archaeological and Epigraphic Evidence from the Shenoutean Women’s Monastery at Atripe,” Le Muséon 133 (2020), 259–287.
[7] Deposits containing ceramic material of similar date have also been found elsewhere at Atripe by the University of Tübingen expedition, see G. Pyke, “The Ceramic Material from Athribis: The 2007/8–2010/11 Excavation Seasons,” in Athribis V, 243–250, 277–281, figs. 8–9 and 21; G. Pyke, “The Ceramic Material from Athribis: The 2012/13–2014/15 Excavation Seasons,” in Athribis V, 306–314, 339–344, figs. 2 and 14.
[8] Pyke, “Ceramic Material 2007/8–2010/11,” 250–261, 282–291, figs. 9–12 and 21–22; Pyke, “Ceramic Material 2012/13–2014/15,” 314–333, 345–358, figs 5–17 and 19.
[9] El-Masry, “More Recent Excavations,” fig. 4.
[10] El-Masry, “More Recent Excavations,” fig. 4.